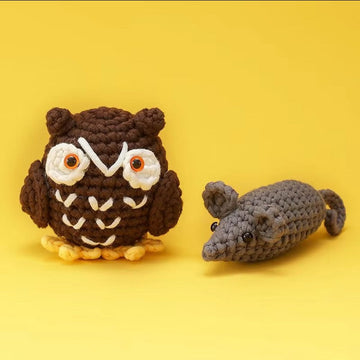

Why Crochet an Amigurumi Owl?
Owls are one of the most beloved amigurumi animals for a simple reason: their round, expressive faces are forgiving for beginners. A slight imperfection in your stitches? Those big safety eyes will draw all the attention anyway. Owl amigurumi have been surging in popularity on craft forums and social media, and it's easy to understand why — they work as gifts, nursery decor, and satisfying solo projects that you can complete in a single weekend.
Unlike some amigurumi animals that require complex shaping for snouts or elongated limbs, the classic owl body is essentially a large oval — one of the first shapes any beginner learns to crochet in the round. That makes this tutorial genuinely accessible, even if you've only ever made a few practice swatches.
In this guide you'll learn:
- Exactly which materials you need (with specific sizes and weights)
- How to read the abbreviations used in owl amigurumi patterns
- A complete round-by-round breakdown of the owl body, head, wings, and feet
- How to attach safety eyes at the correct gauge distance
- Finishing and assembly tips so your owl stands up and looks polished
If you'd rather skip sourcing individual supplies and get everything in one box, check out our Beginner Crochet Kit collection — every kit includes pre-wound yarn, the right hook size, safety eyes, a needle, and a step-by-step pattern card.
Materials You'll Need
Having the right materials before you start saves you from mid-project frustration. Here's exactly what this owl pattern requires:
Yarn
- Main color (body and head): approximately 60 g of DK-weight (light #3) yarn in your chosen owl color. Browns, grays, tawny oranges, and cream all look authentically owl-like. You can also go whimsical with bright teal or lilac.
- Contrast color 1 (wing tips and ear tufts): approximately 10 g of a darker or contrasting shade
- Contrast color 2 (tummy/chest patch): approximately 15 g of a lighter cream or warm white
- Eye ring color: approximately 5 g of yellow, gold, or orange — this frames the safety eyes and gives the owl its iconic stare
DK-weight acrylic yarn is the best choice for beginners: it's affordable, machine-washable, widely available, and keeps its shape well when stuffed. Avoid cotton for your first attempt — it has less stretch and makes tight amigurumi stitches harder to insert your hook into.
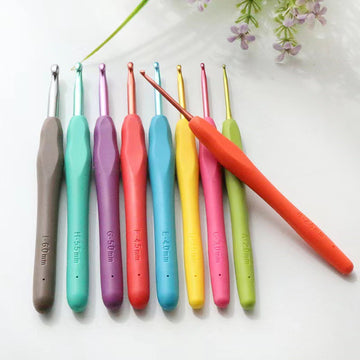
Hook
Use a 3.0 mm or 3.5 mm crochet hook. Going down one hook size from the yarn's recommended size is intentional: tighter fabric means no stuffing shows through the gaps. If you find your stitches are very tight and your hands fatigue quickly, try 3.5 mm instead.
Other Supplies
- 2 × 12 mm black safety eyes (standard for a medium-sized owl, approximately 15–18 cm tall when finished)
- Polyester fiberfill stuffing — approximately 40–50 g
- Tapestry or yarn needle
- Stitch markers (at least 3)
- Scissors
Abbreviations Used in This Pattern
If you're new to written crochet patterns, these shorthand codes will appear throughout every round:
- MR — Magic Ring (also called magic circle or adjustable ring)
- SC — Single Crochet
- Inc — Increase: 2 SC worked into the same stitch (adds 1 stitch)
- Dec — Decrease: invisible decrease worked over 2 stitches (removes 1 stitch)
- BLO — Back Loop Only: insert hook into back loop only of the stitch
- CH — Chain
- SL ST — Slip Stitch
- [X] × N — Repeat what's in brackets N times
- (N) — Stitch count at the end of the round
All rounds are worked in continuous spirals (no slip stitch or chain to join at round end) unless otherwise stated. Use a stitch marker in the first stitch of each new round so you always know where the round begins.
Pattern: The Owl Body
The owl body is crocheted from the bottom up. It forms the main oval torso and, in this design, the head is integrated into the upper portion rather than being a separate piece — this reduces the number of seams and makes assembly easier.
Rounds 1–6: Base of the Body (Starting at the Bottom)
Work in main color (MC).
- R1: MR, 6 SC into ring. Pull ring closed. (6)
- R2: [Inc] × 6 (12)
- R3: [SC, Inc] × 6 (18)
- R4: [SC 2, Inc] × 6 (24)
- R5: [SC 3, Inc] × 6 (30)
- R6: [SC 4, Inc] × 6 (36)
After Round 6, your piece should measure approximately 6 cm in diameter. If it's significantly larger, go down a hook size; if smaller, go up.
Rounds 7–10: The Tummy Patch
Switch to contrast color 2 (cream/white) for Round 7 through Round 10 for the chest/tummy area. You'll carry the MC on the inside or cut and rejoin — for short color sections, cutting and weaving in ends is cleaner.
- R7–R10: SC in each stitch around (36) — work 4 even rounds with no increases or decreases
Then switch back to MC for the rest of the body.
Rounds 11–20: Building the Body Height
- R11–R19: SC in each stitch around (36) — 9 even rounds to build the body height
- R20: [SC 4, Dec] × 6 (30)
At this point, begin stuffing loosely. Use small amounts of fiberfill and push it into corners of the piece. Overstuffed amigurumi become misshapen; understuffed ones look floppy. Aim for a firm but slightly squishy feel.
Rounds 21–28: The Shoulder Region and Head Shaping
- R21: [SC 3, Dec] × 6 (24)
- R22: [SC 2, Dec] × 6 (18)
- R23–R25: SC around (18) — 3 even rounds for neck area
- R26: [SC 2, Inc] × 6 (24)
- R27: [SC 3, Inc] × 6 (30)
- R28: [SC 4, Inc] × 6 (36)
The increase rounds at R26–R28 widen back out to form the owl's large round head. Add more stuffing as you go, making sure the neck area gets support too.
Rounds 29–35: The Head
- R29–R32: SC around (36) — 4 even rounds
- R33: [SC 4, Dec] × 6 (30)
- R34: [SC 3, Dec] × 6 (24)
Now is the time to insert safety eyes. Position them between rounds 30 and 31, with approximately 8–10 stitches between the eyes (center to center). Push the post of each eye through the fabric and snap on the locking washer firmly on the inside. Once safety eyes are installed, they cannot be removed without cutting the fabric, so double-check placement before locking them in.
- R35: [SC 2, Dec] × 6 (18)
Add a final layer of stuffing to the head — this is the part that needs the most firmness so the owl holds its upright posture.
- R36: [SC, Dec] × 6 (12)
- R37: [Dec] × 6 (6)
Close the opening: cut yarn leaving a 10 cm tail, thread onto tapestry needle, and run needle through the front loop of all 6 remaining stitches. Pull tight to close, then weave in end on the inside.
Pattern: Eye Rings
The eye rings are the signature feature that makes owl amigurumi unmistakable. Make 2 in the eye ring color.
- R1: MR, 6 SC (6)
- R2: [Inc] × 6 (12)
- R3: [SC, Inc] × 6 (18)
Fasten off, leaving a long tail for sewing. Before attaching, poke a small hole in the center of each eye ring and push the safety eye post through it — this creates the look of the eye sitting within a pale circle. Then insert the post through the head fabric and lock as above.
Sew the eye rings flat against the head using the long tail, stitching all the way around the outer edge. The finished rings should sit flush with no puckering.
Pattern: Ear Tufts
Real owls (like the Great Horned Owl) have distinctive tufts above their eyes. Here's how to make them in contrast color 1:
- R1: MR, 5 SC (5)
- R2: [Inc] × 5 (10)
- R3: SC around (10)
- R4: [Dec] × 5 (5)
Don't stuff these — leave them flat. Sew one on either side of the top of the head, positioned above and slightly outside each eye. Angle them slightly outward for a dramatic, wise-looking expression.
If you prefer a rounder, baby-owl look without tufts, skip this step entirely — the head looks complete without them.
Pattern: Wings
Make 2 wings in MC with contrast color detailing on the tips.
- R1: MR, 4 SC (4)
- R2: [Inc] × 4 (8)
- R3: [SC, Inc] × 4 (12)
- R4: [SC 2, Inc] × 4 (16)
- R5–R8: SC around (16) — 4 even rounds
- R9: [SC 2, Dec] × 4 (12)
- R10: [SC, Dec] × 4 (8)
Switch to contrast color 1 for the final 2 rounds:
- R11: SC around (8)
- R12: [Dec] × 4 (4)
Fasten off, leaving a long sewing tail. Lightly stuff the wide portion of the wing; leave the tip flat. Flatten the piece slightly before sewing — wings that are too round look stubby. Sew each wing to the side of the body at approximately round 18–20, angling them slightly downward and backward.
Pattern: Feet
Owl feet are small oval shapes in a contrasting warm color (golden yellow or orange works beautifully).
- CH 5, then working back along the chain:
- SC in 2nd CH from hook, SC 2, Inc in last CH
- Rotate and work back along the other side: SC 2, Inc (8)
- R2–R3: SC around (8)
Make 2. Don't stuff them — leave flat and sew to the bottom front of the body, angling each foot outward so the owl appears to be standing. The feet also help balance your owl so it sits upright on a shelf.
Pattern: Beak
A small triangular beak in golden orange or amber:
- CH 2
- Row 1: 2 SC in 2nd CH from hook, CH 1, turn
- Row 2: SC, SC, CH 1, turn
- Row 3: Dec
Fasten off. This creates a small triangle. Fold slightly and sew to the center of the face, directly below and between the two eye rings.
Assembly: Putting Your Owl Together
Assembly is often where beginners feel uncertain, but follow these steps in order and it becomes straightforward:
- Attach eye rings and eyes first (before closing the head, so the washers are accessible from inside)
- Sew on ear tufts — pin them in position, step back and check symmetry, then sew
- Attach beak centered between the eyes, just below the eye rings
- Attach wings — pin both in place before sewing either one; this helps you match the height and position on both sides
- Attach feet to the bottom of the body, angled outward
Use the long yarn tails left from each piece for sewing. Thread the tail onto a tapestry needle and use a whip stitch or mattress stitch to join each piece to the body. After sewing each piece, weave in the tail end on the inside and trim.
Customization Ideas
One of the joys of amigurumi is how easily a basic pattern becomes your own:
- Glasses: Use embroidery thread to stitch circular glasses frames below the eye rings
- Book: Make a tiny flat rectangle in brown/cream and tuck it under one wing
- Color themes: A teal-and-gold owl for Harry Potter fans; a black-and-orange owl for Halloween; a pastel pink owl for a baby shower gift
- Size scaling: Use bulky (weight #5) yarn with a 5.0 mm hook for a large pillow-sized owl; use fingering weight yarn with a 2.0 mm hook for a miniature brooch-sized version
- Barn owl vs. great horned owl: Skip the ear tufts and use a heart-shaped white face disc for a barn owl look
Troubleshooting Common Owl Amigurumi Problems
My owl looks lopsided
This usually means the eye rings or ear tufts are positioned unevenly. Before sewing any face element permanently, pin it with a quilting pin or needle and photograph the front view. If it looks off in the photo, it will look off in person.
My stitches are too loose and the stuffing shows
Drop down one hook size. Amigurumi should always be worked tighter than you think is comfortable — the goal is a dense, gap-free fabric. Alternatively, use a darker yarn color so gaps are less visible.
The owl won't stand up
Check that the feet are attached far enough to the front of the body and angled correctly. If the feet are positioned too far back or too close together, the owl tilts backward. You can also add a small disc of cardboard or plastic inside the bottom of the body before closing, to create a flat base.
My magic ring keeps coming undone
After pulling the ring tight, make a slip stitch or your first SC locks the ring size. Then weave the yarn tail through several stitches in different directions before trimming — at least 3–4 weavings in the first few rounds to prevent it unraveling.
How Long Does an Amigurumi Owl Take to Make?
Most beginners complete their first owl amigurumi in 6–10 hours spread across 2–3 sessions. Experienced amigurumi makers can finish in 3–4 hours. The body (the largest piece) takes roughly 60–70% of the total time. If this is your first amigurumi project, don't rush — taking your time on the eye placement and assembly makes a significant difference in the finished look.
Ready to start? Our crochet amigurumi kits include everything you need — pre-sorted yarn amounts, the right hook, safety eyes, stuffing, and pattern cards — so you can skip the supply hunt and start crocheting immediately.
Frequently Asked Questions
What size safety eyes should I use for an amigurumi owl?
For a medium owl (15–18 cm tall) crocheted in DK-weight yarn, use 12 mm black safety eyes. For a smaller owl under 12 cm, use 9 mm eyes. For a larger owl over 20 cm, 15–18 mm eyes look proportional. Always install safety eyes before closing the head — once the opening is too small to reach inside and snap on the washer, they cannot be attached safely.
Can I crochet an amigurumi owl as a complete beginner?
Yes. The owl body is a cylinder with a widened head, which is a basic amigurumi shape. You need to know four things: the magic ring, single crochet, increases, and decreases. If you've practiced those four stitches, you can complete this owl. Budget extra time for the assembly step — sewing on the small pieces (beak, eye rings, tufts) is where patience matters most.
What yarn is best for amigurumi owls?
DK-weight acrylic yarn is the most practical for beginners: it's available in hundreds of colors, inexpensive, machine-washable, and has enough elasticity to make tight amigurumi stitches manageable. Avoid fuzzy or textured yarns — they make it difficult to count stitches and see your work clearly. Once you're comfortable with the pattern, try cotton yarn for a firmer, more sculptural finish.
How do I keep my amigurumi owl from falling over?
Attach the feet to the front-bottom of the body, angled outward at roughly 45 degrees. Make sure the body base is well-stuffed and firm. For extra stability, cut a small circle of craft foam or cardboard to fit inside the base of the body before closing. You can also insert a small amount of plastic pellets or dried beans at the very bottom for weight, topped with fiberfill.
Do I need to block amigurumi?
Typically no. Amigurumi are three-dimensional and stuffed, so wet-blocking (which flattens fabric) is not appropriate. However, if your yarn has some natural fiber content (wool, alpaca), a light steam with an iron held 5–8 cm away can help relax any stiff or misshapen areas without distorting the piece.
How much yarn does an amigurumi owl use?
A medium owl (15–18 cm tall) in DK-weight yarn uses approximately 60 g of main color, 15 g of chest/tummy color, 10 g of wing-tip contrast, and 5 g of eye-ring and beak color — roughly 90 g total. A 100 g skein of each color will comfortably cover one owl with yarn left over for swatching and mistakes.
Can I make the owl without a magic ring?
Yes, if you find the magic ring difficult, use the alternative chain method: CH 2, then work 6 SC into the 2nd chain from the hook. This creates a slightly larger center hole, but for most projects (especially stuffed amigurumi where the base isn't visible) the difference is unnoticeable.


