

Why Crochet an Amigurumi Bunny?
The amigurumi bunny is one of the most universally loved beginner crochet projects — and for excellent reasons. Rabbits have a compact, round body structure that maps perfectly onto amigurumi construction techniques. Their long, floppy ears provide a satisfying visual payoff without adding any structural complexity. Whether you are crocheting a baby shower gift, an Easter decoration, or simply want a soft companion to keep on your desk, a handmade amigurumi bunny punches well above its skill-level requirement in terms of cuteness.
This complete step-by-step guide walks you through every element of crocheting an amigurumi bunny from start to finish: the head, body, long ears, two arms, two legs, and a fluffy little tail. No amigurumi experience is required — if you can single crochet, work a magic ring, and count your stitches, you have everything you need. By the end, you will have a finished bunny measuring approximately 15–18 cm tall when sitting, and a solid understanding of the amigurumi techniques that transfer to almost every other project in the craft.
Materials and Tools
Yarn Selection
For this bunny, worsted weight yarn (labeled as weight #4 on most skeins) is the most beginner-friendly choice. The stitches are large enough to count easily, and you do not need to squint to track your rounds. DK weight (#3) is also a good option if you want a slightly smaller, more delicate finished toy.
Fiber content matters more in amigurumi than in most other crochet projects. Choose a smooth yarn — 100% cotton, cotton-acrylic blend, or a smooth acrylic. Avoid bouclé, mohair, velvet, or any yarn with a fuzzy or textured surface. These fibers make it nearly impossible to see individual stitches, which means you cannot count your increases and decreases accurately. Many beginners make their first amigurumi out of fluffy yarn thinking it will look extra soft, then spend hours trying to find their stitch marker among the haze. Smooth yarn looks cleaner, photographs better, and is significantly easier to work with.
Total yarn needed: approximately 130–160 meters of your main color for a bunny worked in one solid color. If you want contrasting inner ears, set aside an additional 15–20 meters of a coordinating color (pale pink is classic). You can purchase yarn by the skein at most craft stores; a single standard skein of worsted (typically 200–220 meters) is more than enough for this project.
Hook Size
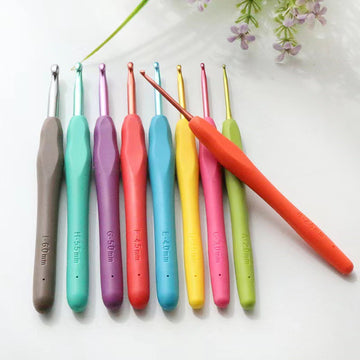
Use a hook that is 0.5–1 mm smaller than what your yarn label recommends. If your worsted yarn says 4.5 mm, use a 3.5 mm or 4.0 mm hook. This creates a tighter fabric with smaller gaps between stitches — essential in amigurumi to prevent the white stuffing from peeking through the finished toy. The fabric will feel slightly stiff compared to regular crochet, which is exactly right. If your finished stitches feel loose or you can see light through the fabric when you hold it up, go down another 0.5 mm.
Other Supplies
You will also need: two safety eyes in 9 mm or 12 mm diameter (for an adult gift; use 9 mm maximum for babies and young children, or embroider the eyes instead with yarn — see the FAQ section for child safety guidance), polyester fiberfill stuffing, a locking stitch marker or a small piece of scrap yarn, a blunt-tip tapestry needle, and scissors. A small amount of pink embroidery floss or pink yarn is useful for embroidering the nose.
Abbreviations Used in This Pattern
MR = Magic ring. sc = Single crochet. inc = Increase: 2 single crochets worked into the same stitch. dec = Invisible decrease: insert hook through the front loop only of the next stitch, then the front loop only of the following stitch, pull up a loop, yarn over, pull through all 3 loops. sl st = Slip stitch. ch = Chain. The number in parentheses at the end of each round is the total stitch count for that round.
This pattern is worked in continuous rounds (spiraling), not joined rounds. Place a stitch marker in the first stitch of each round and move it up as you progress. This is not optional — without a stitch marker, you will lose track of where rounds begin.
Step-by-Step Bunny Pattern
Head
Start with the head. You must finish the head — including inserting the safety eyes — before closing it up, because once the opening is too small, you cannot reach inside to attach the eyes securely.
Round 1: MR, 6 sc into ring, pull tight to close. (6)
Round 2: Inc in each st around. (12)
Round 3: [sc 1, inc] × 6. (18)
Round 4: [sc 2, inc] × 6. (24)
Round 5: [sc 3, inc] × 6. (30)
Round 6: [sc 4, inc] × 6. (36)
Rounds 7–12: sc in each st around. (36) — six even rounds with no shaping.
Before continuing: attach safety eyes now. Position them between rounds 8 and 9, roughly 10–12 stitches apart. Push the post of the eye through from the right side (outside) of the fabric. From inside, press the washer firmly onto the post until it clicks and locks in place. Once locked, safety eyes cannot be removed without damaging the fabric, so take your time positioning them before you click the washers on.
Round 13: [sc 4, dec] × 6. (30)
Round 14: [sc 3, dec] × 6. (24)
Round 15: [sc 2, dec] × 6. (18)
Stuff the head now. Fill it firmly with polyester fiberfill — more than you think is necessary. A well-stuffed head holds its round shape; an understuffed head collapses into a lumpy oval. Push filling into the top dome first, then pack in the sides.
Round 16: [sc 1, dec] × 6. (12)
Round 17: [dec] × 6. (6)
Cut yarn leaving a 20 cm tail. Thread the tail onto your tapestry needle, weave through the 6 remaining stitches, pull tight to close the opening completely, and fasten off. Set head aside.
Body
Round 1: MR, 6 sc into ring. (6)
Round 2: Inc in each st around. (12)
Round 3: [sc 1, inc] × 6. (18)
Round 4: [sc 2, inc] × 6. (24)
Round 5: [sc 3, inc] × 6. (30)
Rounds 6–12: sc in each st around. (30) — seven even rounds.
Round 13: [sc 3, dec] × 6. (24)
Round 14: [sc 2, dec] × 6. (18)
Round 15: [sc 1, dec] × 6. (12)
Stuff the body firmly. The body should be slightly more oval than round — taller than it is wide.
Round 16: [dec] × 6. (6)
Cut yarn, thread through remaining stitches, pull tight and fasten off. Leave a long tail (30–40 cm) for sewing the head to the body.
Long Ears (Make 2)
The ears are what make a bunny unmistakably a bunny. They are crocheted as long, flat ovals. For each ear:
Round 1: MR, 6 sc into ring. (6)
Round 2: Inc in each st around. (12)
Round 3: [sc 1, inc] × 6. (18)
Rounds 4–10: sc in each st around. (18) — seven straight rounds, creating the long tube shape of the ear.
Round 11: [sc 1, dec] × 6. (12)
Do not close or stuff the ears — leave them open at the base and slightly floppy. Cut yarn leaving a 25 cm tail for attaching to the head. If you want contrasting inner ears, work rounds 1–10 in your accent color, then switch to the main color for round 11 and the attachment tail, OR work the ear in the main color and use a tapestry needle to embroider a simple oval in pink yarn or thread on the inner surface once finished.
Front Legs / Arms (Make 2)
Round 1: MR, 6 sc into ring. (6)
Round 2: Inc in each st around. (12)
Rounds 3–8: sc in each st around. (12) — six straight rounds.
Stuff lightly — arms do not need heavy stuffing. Cut yarn leaving a 25 cm attachment tail.
Back Legs (Make 2)
The back legs are slightly larger than the arms to give the bunny its characteristic seated pose.
Round 1: MR, 6 sc into ring. (6)
Round 2: Inc in each st around. (12)
Round 3: [sc 1, inc] × 6. (18)
Rounds 4–8: sc in each st around. (18) — five straight rounds.
Round 9: [sc 1, dec] × 6. (12)
Stuff firmly. Cut yarn leaving a 25 cm attachment tail.
Tail
Round 1: MR, 6 sc into ring. (6)
Round 2: Inc in each st around. (12)
Rounds 3–4: sc in each st around. (12)
Round 5: [dec] × 6. (6)
Lightly stuff. Pull the tail yarn through remaining 6 stitches to close. Leave a long attachment tail.

Assembling Your Amigurumi Bunny
Attaching the Head to the Body
Place the head on top of the body, aligning the closed bottom of the head with the closed top of the body. The head should sit centrally on top, slightly forward-tilted for a natural, attentive look. Thread the long tail from the body onto your tapestry needle. Using a whip stitch or a mattress-style stitch, sew around the full circumference of the seam. As you sew, leave a small gap and push in a little extra stuffing if the body feels too soft or if the seam causes the body to indent. Pull the thread tight to close the gap and fasten off securely inside the body. Run the needle back through the body one more time and snip the tail close to the fabric — it will retract inside and disappear.
Attaching the Ears
Pin the ears in place before committing to sewing. They should sit on top of the head, roughly above and slightly in front of the eyes. The gap between the ears should match the gap between the eyes. Once you are satisfied with the placement, sew each ear down through the open base, stitching through several layers for stability. Bunny ears take some pulling and tugging from admiring humans, so make the attachment extra secure. Fasten off and hide the tails inside the head.
Attaching the Back Legs
The back legs should splay outward from either side of the lower body, allowing the bunny to sit upright. Position them so that roughly the bottom half of each leg extends forward and slightly downward from the body's equator. This placement is what makes a seated pose possible. Sew firmly, using all 25 cm of attachment yarn, and fasten off inside the body.
Attaching the Arms
The arms attach to the sides of the body, positioned between the body's equator and the neck. They should hang slightly downward and forward. Sew down through the open top of each arm. Fasten off inside the body.
Attaching the Tail
The tail goes on the back of the body, roughly centered at the mid-height of the torso. Sew through the tail and into the body several times. Fasten off inside the body.
Embroidering the Nose
Using pink embroidery floss or a strand of pink yarn threaded onto your tapestry needle, stitch a small inverted triangle or Y-shape at the center of the face, just below and between the eyes. Three or four stitches are all you need. For a more sculpted look, pull the nose stitches slightly tighter than feels comfortable — the resulting indent in the face fabric is what gives amigurumi that characteristic dimpled expression. Fasten off inside the head.
Troubleshooting Common Problems
My Bunny Won't Sit Up Straight
This usually comes down to one of three issues: the back legs are positioned too far back or too far forward, the body is understuffed and collapsing, or the head is too heavy relative to the body. Try repositioning the legs further forward and ensuring the body is packed very firmly. If the bunny still topples, add a small flat disc of cardboard (cut from a cereal box) inside the base of the body before closing it — this gives the bunny a stable flat bottom to sit on.
The Stuffing Shows Through
Your hook is too large relative to your yarn weight. Next time, go down a hook size. For the current project, try using a cotton yarn in the same or darker color to re-sew any areas where the stuffing is showing, closing the gaps with a few overcasting stitches on the inside of the fabric.
Stitch Count Drifting
If your bunny's body or head is ending up with more or fewer stitches than the pattern calls for, you are either missing increases/decreases or accidentally adding extra stitches. Use a stitch marker religiously and count at the end of every single round, not just occasionally. It takes about ten seconds to count 30 stitches and can save you from having to unravel entire sections.
My Ears Keep Collapsing
Floppy, un-stuffed ears are endearing on stuffed animals, but if yours are collapsing rather than gently drooping, try inserting a thin strip of pipe cleaner (craft wire) inside each ear before sewing it to the head. The wire holds the ear in a natural, slightly curved position. Bend the bottom of the wire into a small loop before inserting to prevent sharp ends from poking through.

Variations and Customizations
Color Variations
Classic amigurumi bunnies are made in white, grey, brown, or a soft pastel, but there is absolutely no rule that says your bunny must be a realistic color. Bright teal bunnies, rainbow-striped bunnies, and lavender bunnies are all wonderful. If you want to incorporate stripes or color changes, simply switch colors at the beginning of a new round by drawing the new color through the final step of the last stitch in the previous round.
Size Adjustments
To make a larger bunny, simply use heavier yarn — bulky (#5) or super bulky (#6) — and scale your hook size accordingly (still going down 0.5–1 mm from the yarn's recommendation). A super bulky bunny worked on a 5 mm hook can measure 30+ cm when seated. To make a smaller bunny, use fingering weight (#1) yarn and a 1.5–2 mm hook. A mini bunny worked in fingering weight measures around 7–8 cm seated and makes a wonderful keychain or bag charm.
Adding Clothing
Amigurumi bunnies are often dressed in tiny crocheted cardigans, scarves, or bow ties. These accessories are separate crocheted pieces sewn onto the finished bunny. A simple scarf is nothing more than a chain long enough to wrap around the bunny's neck, worked for 3–4 rows in single crochet, then tied in a loose knot.
Why a Kit Makes This Even Easier
If you found gathering the supplies above a little overwhelming, you are not alone. One of the most common reasons beginners abandon their first amigurumi project is not the crocheting itself — it is not knowing which yarn to buy, which hook size to pair it with, and what size safety eyes to get. A crochet amigurumi kit solves this problem completely by providing everything pre-matched and pre-measured: the right yarn in the right colors, the correct hook, safety eyes, stuffing, a tapestry needle, and step-by-step instructions. You open the box and start crocheting.
WooHobby's Beginner Crochet Kit collection is specifically designed for first-time amigurumi makers. Every kit includes carefully chosen materials that work together without any guesswork. If the bunny pattern above has you interested in exploring other beginner-friendly amigurumi projects, the Crochet Amigurumi Kits collection has a wide range of animals and characters at various skill levels.
How to Care for Your Finished Amigurumi Bunny
Most polyester stuffed toys can be hand-washed in cool water with a small amount of mild soap. Gently squeeze (do not wring) and lay flat to dry. If your yarn is 100% cotton, it can generally tolerate a delicate machine wash in a mesh laundry bag. Avoid hot water, which can felt certain wool yarns and distort the shape. Safety eyes are waterproof and will not be affected by washing.
If the bunny is intended for a baby or very young child and you have used embroidered yarn eyes instead of safety eyes (see FAQ below), check the embroidery after washing to make sure the stitches remain intact and nothing has come loose.
Frequently Asked Questions About Crocheting an Amigurumi Bunny
How long does it take to crochet an amigurumi bunny?
A complete amigurumi bunny using worsted weight yarn takes most beginners 6–10 hours across multiple sessions. Experienced amigurumi crafters who are familiar with the construction process can complete the same project in 3–4 hours. The ears and assembly typically take longer than the body or head because they require careful positioning and secure attachment stitching.
What size safety eyes should I use for an amigurumi bunny?
For a standard worsted weight bunny measuring 15–18 cm when seated, 9 mm or 12 mm safety eyes both work well. Larger eyes (12 mm) give the bunny a more cartoonish, wide-eyed expression. Smaller eyes (9 mm) create a slightly more subtle, classic look. If the toy is intended for a child under 3 years old, do not use plastic safety eyes at all — even locked safety eyes can potentially be removed by determined small hands. Instead, embroider the eyes using black yarn or embroidery floss.
Can I crochet an amigurumi bunny without a magic ring?
Yes. If the magic ring is giving you trouble, you can substitute it with a simple chain-2 start: chain 2, work 6 single crochets into the second chain from the hook, and pull the tail to close the center as tightly as possible. The result is nearly identical. The magic ring produces a slightly cleaner, tighter center, but both methods work for a finished bunny.
Why are my bunny's ears not staying up?
Amigurumi bunny ears are designed to be floppy rather than rigid — this is part of their charm. If you want ears that stand upright (like a wild rabbit rather than a lop rabbit), insert a bent pipe cleaner or a thin strip of wire inside each ear before sewing it to the head. Bend the ends of the wire into small loops first to prevent sharp points. Alternatively, lightly starch the finished ears with a mixture of water and craft glue diluted 50:50, shape them while damp, and let them dry completely.
How do I make the bunny sit without tipping over?
Stable sitting posture comes from three things: firmly stuffed body, back legs positioned slightly forward (not directly to the sides), and a head that is not too large relative to the body. If your bunny still tips forward, check that the nose embroidery is not pulling the head's weight forward. A small flat piece of cardboard inserted inside the base of the body before closing also helps by lowering the center of gravity.
Is an amigurumi bunny a good first amigurumi project?
The bunny is one of the best first amigurumi projects available. Its body and head are both simple circles/spheres requiring only single crochet, increases, and decreases — the three core amigurumi techniques. The ears introduce the concept of making elongated pieces without added complexity. The only slightly challenging part is the assembly (sewing pieces together neatly), but this improves rapidly with practice and does not require any additional stitches. For a genuine first-timer, a simple round bear or cat is slightly easier because they have shorter, stubby ears, but the bunny is not far behind in difficulty.
What is the best yarn brand for amigurumi beginners?
Any smooth, consistent worsted or DK weight yarn in cotton or acrylic works well. Widely available and beginner-friendly options include Lion Brand Vanna's Choice (acrylic, very smooth, dozens of colors), Paintbox Yarns Simply DK (cotton-acrylic blend, excellent stitch definition), and DMC Natura Just Cotton (100% cotton, great for baby items). The most important quality is smoothness — if you can see each individual stitch clearly when you hold the skein up to light, the yarn will work well for amigurumi.


